Exposure Made Simple: The Beginner’s Shortcut to Better Photos
Have you ever taken a photo that looked perfect in your head but came out too dark, too bright, or just off? You’re not alone. The secret to fixing that isn’t buying a new camera, it’s understanding the Exposure Triangle.
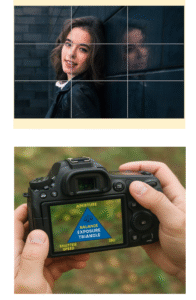
Aperture, shutter speed, and ISO are the three settings that decide how your photo looks and feels. Learn how they work together, and you’ll go from “lucky shots” to consistently great images — no matter your camera or skill level.
What Is the Exposure Triangle?
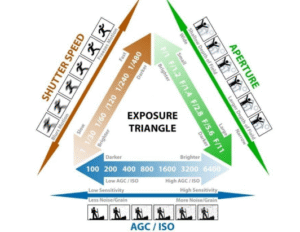
Think of the Exposure Triangle as three controls that shape your image: Aperture, Shutter Speed, and ISO. Each one affects light in a different way, and together, they determine whether your shot nails the mood or misses the mark.
1. Aperture (f-stop): Painting with Focus
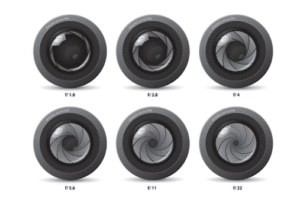
Aperture refers to the size of the lens opening.
- Wide aperture (low f-number like f/1.8) = more light, creamy blurred backgrounds — perfect for portraits.
- Narrow aperture (high f-number like f/16) = less light, sharp focus from front to back — ideal for landscapes.
Pro Tip: Wide = dreamy blur. Narrow = sharp everywhere.
2. Shutter Speed: Freezing or Showing Motion
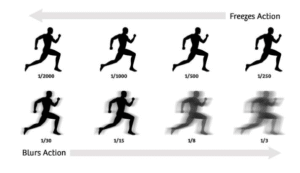
Shutter speed controls how long your camera’s sensor is exposed to light.
- Fast shutter speed (1/1000s) freezes action — sports, wildlife, fast-moving subjects.
- Slow shutter speed (1/30s or slower) creates motion blur — waterfalls, light trails, creative movement shots.
Pro Tip: Use fast speeds for handheld shots; slow speeds for drama (tripod recommended).
3. ISO: The Light Sensitivity Dial

ISO adjusts your camera’s sensitivity to light.
- Low ISO (100–200) = clean, crisp images in bright light.
- High ISO (3200+) = brighter shots in low light but more grain (noise).
Pro Tip: Keep ISO as low as possible for the cleanest results.
Balancing the Triangle
Photography is all about trade-offs. Change one setting, and you’ll need to adjust the others to maintain the right exposure.
Example: Shooting with a wide aperture in bright daylight? You’ll need a faster shutter speed or lower ISO to avoid overexposure.
The magic happens when you start balancing these settings intentionally and not just letting the camera decide for you. To help you boost your exposure skills, here is a quick challenge.
Quick Challenge: The Light Balance Test
Objective: Practice adjusting aperture, shutter speed, and ISO to see how each changes your image.
Steps:
- Pick a subject with decent lighting.
- Take three shots:
- Wide Aperture: f/2.8 + fast shutter + low ISO
- Narrow Aperture: f/11 + slower shutter + higher ISO
- Low Light Test: f/4 + slower shutter + higher ISO (1600+)
- Wide Aperture: f/2.8 + fast shutter + low ISO
- Compare the results:
- How does background blur change?
- How does motion look — frozen or blurred?
- How much grain appears at higher ISOs?
- How does background blur change?
Try it twice: once in natural daylight, once indoors with artificial light, and compare your results.
Final Takeaway
The Exposure Triangle isn’t just a technical concept, it’s your first step toward creative control. It is one of the most critical pillars of photography. Learning it gives you control over light, mood, and clarity in every frame you take. But knowledge alone isn’t enough; real progress comes only with practice. When you start to put these concepts into work over and over again, picking the right exposure settings would become second nature to you.
Once you have sharpened this skill, don`t stop there. If the exposure triangle lays the foundation then composition is what refines your storytelling; making simple images to powerful visual pictures.
So, come back for our next article, where we will dive into composition techniques that improve not just what you capture but how your audience experiences it.